Extenders are an excellent way to expand the coverage of WiFi network. In the past few years, there has been a number of innovations to amplify the wireless range without the need for a new WiFi system. Extenders are a cost-effective solution and particularly, Linksys Extenders are known for its affordable lineup of products. If you have bought a Linksys Extender recently then RouterGuide is going to help you with the setup process. The setup is quite straightforward and also have tried to simplify the process in a non-technical language. So without losing any time, let us proceed to Linksys Extender Setup.
How to get started with Linksys Extender Setup?
First and foremost, you have to understand a few basic points before proceeding further. An Extender is basically a repeater which increases the range of WiFi the same way a router does. It is basically a router in itself but works in sync with the existing router. Additionally, this guide works on all models of Linksys Extenders so you do not have to worry about that. Having said this, let us move on to the next step.
Steps for Linksys WiFi Extender Setup:
- Plug the Extender to a power socket and wait till all the indicators become stable. During the initial setup, try to keep the Linksys Extender near your router for easy access. After the initial setup, you are free to plug it anywhere inside your premises.
- Next, connect the Extender to your router using an Ethernet cable. Note that, all the setup process should be done through a wired connection so that seamless connection can be established. Also, keep in mind, your PC should be connected to the router either through WiFi or Ethernet cable.
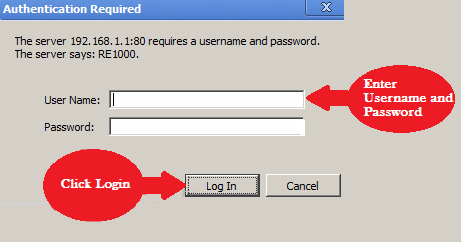
- Now open a browser on your PC and type 192.168.1.1 in the search bar and hit enter. It will open the Linksys Extender Setup page. Keep the username field blank and type admin as password and click on login button. You will be logged in and it will lead to the settings page.
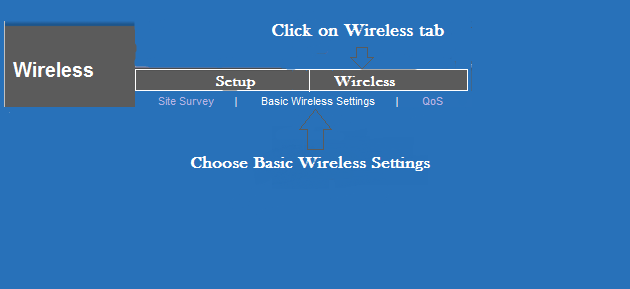
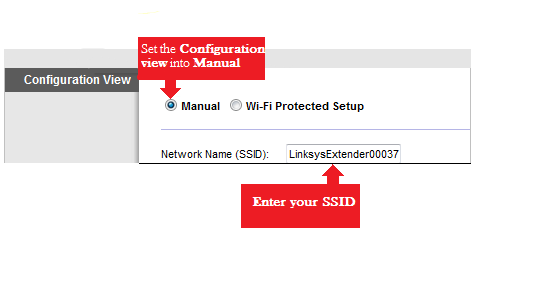
- Here, navigate to the Wireless menu from the top panel and click on Basic Wireless Settings. Now go to Configuration View tab and set the mode to manual. It will then ask for SSID name. SSID is basically the WiFi name of the network device. Find out the WiFi name of the Linksys Extender using a smartphone and enter the exact name of Extender’s WiFi in the SSID field.
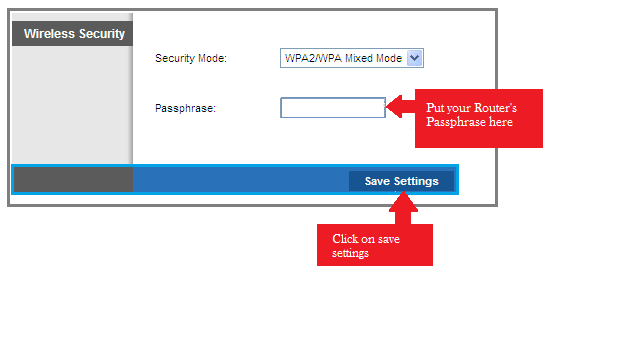
- Next, in the Wireless Security option, change the security option to WPA/WPA2 as it is the best security protocol for wireless network devices. Put a strong password including alphabet, numbers, and characters and click on Save Settings. Now go to Advanced Settings and open Reboot menu. Click on the Reboot button and let it restart itself to complete the Linksys Range Extender Setup.
- After almost 30 seconds, the router will restart and will pair with the Linksys Extender without any problem. Disconnect the Extender from the router and plug it to any corner of your house. You will start getting a wider WiFi coverage and can enjoy Ithe internet without any network drop. This is how you can do Linksys Range Extender Setup through the help of a browser.
Problems faced while Linksys WiFi Extender Setup:
- If you are unable to access the Setup page through 192.168.1.1 then try 192.168.0.1. Both these addresses are assigned for accessing network devices so if the former one is not working then the latter will surely work.
- While Linksys WiFi Extender Setup, if the router is not letting you in with the default credentials then you may have to perform a factory reset. To do so, press and hold the reset button on the back of your router for a while, all the lights will blink at once and your router will be restored to the factory settings. Keep in mind, this will delete all your personal network configuration so keep a network backup handy. After the reset process, you can go ahead with the default password and it will let you in.
- If you want to make sure the Extender is working properly then log in to the router’s settings and open the DHCP table from the left menu. There you will find the IP address of your Extender. Note it down and keep it aside for a while. Now press the Windows and R button at the same time on your PC, it will pop up a small Run window. Type ping IPAddressOfTheExtender and hit enter. It will open a command prompt window with the ping command will display whether the Extender is responding to the ping requests properly. If the Extender is responding within a few milliseconds then your Extender is working fine.
Conclusion
This was an easy guide to access the Linksys Extender settings and pair it with your existing router. RouterGuide hopes this guide made the Linksys Range Extender Setup a breeze and you could finally expand your WiFi coverage without any issue.