To work with the Netgear router is a great experience because of its exclusive features and high-end specifications. If you have a Netgear router and are not completely aware of “how to configure the Netgear router?”, then you have landed on the right page. Moreover, a Netgear router is always known for its flexibility compared to other routers present in the market nowadays.
Therefore, here in this article, we have provided these instructions for configuring the Netgear router.
How to Configure Netgear Router?
You need proper guidance to configure the Netgear router on your own. You need some technical knowledge also to do this. Therefore, follow the instructions and apply them accordingly:
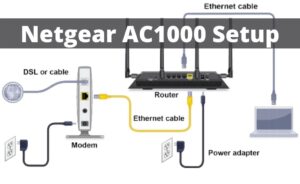
Step 1(a): Connect the System to the Router
When you get the router, simply unbox it and power it up. After that, connect the Act Internet cable to the WAN/Internet port. The ports are in differences with the color. However, an extra is always available with the router. With the cable, connect one end of the router and the other end connect with your device.
Now, open the Run dialog box by pressing the Windows key and “R” at the same time. In the Run box, type ipconfig on the command box. The default gate of the LAN or Ethernet adapter will be Router address.
Step 1(b): Connect the Mobile
To connect the router with the mobile, you need to switch on the router and connect the ACT internet cable to the WAN or the internet port of the router. Just, move to the Settings option of your mobile and turn on the WiFi. Then, you need to wait till the mobile detects the router. When you see the router name on the mobile screen, tab on the Connect option. Do not try to access the login IP on your smartphone if no antivirus software is installed on the device.
However, every router configuration has two ports. One is for the configuring the internet part and the other one is for the configuring the WiFi part. Internet configuration will turn on to browse the internet directly. No need to log in every time. On the other hand, WiFi configuration eases the process of connecting to the router.
Step 2: Logging into the Router
In the next step, you need to log in to the router. To do that, simply launch a browser. Type the router IP address. Hoping that you got the router login dashboard and first you need to turn on the wireless security. To do this, move to the Wireless tab and name the Network name. This could be anything and you will see this name when you try to connect to the Netgear router. This network name is called as SSID. After naming the network, you must turn on wireless security.
Step 3: Internet Connectivity- PPPoE Configuration
Hope you are in the Netgear router’s home page. There you will find the Basic and Advanced option. Select the Basic option and choose the internet from the list that will appear. A pop-up message will prompt. Select Yes option to login Netgear router.
Step 4: Wireless Setup-Router SSID and Password Configuration
After that, move to the Wireless section. A list will appear on the system screen. From the list, you need to choose WEP-AES2 and enter the password. Make sure that you use a strong password and make a note of it for further uses. Otherwise, you need to reset the whole router to factory default settings to reconfigure the wireless Netgear router.
The next core setting is to change the device password. To change the Netgear router login and password, simply go to the Device option and choose a password. Just enter your desired password.
Step 5: Test the Configuration
Once everything is completed, you must reboot the Netgear router for the changes to take effects. Make sure that the configuration retained across the router.
Now, reconnect to the wireless network with the new WiFi password and enjoy browsing the internet without having any fear of an intruder. If you are looking for an effective guide on “how to configure the wireless network?”, the steps cited above is sure to help you.
Last Words
Hope, this article will be of enough help to configure the Netgear router in a step-by-step manner. Well, you have successfully applied all the steps as mentioned in the above section and get success in order to configure the Netgear wireless router with ease.