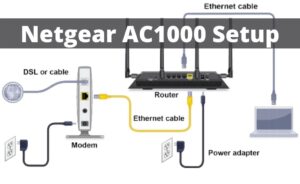
IoT devices like smart bulbs, home automation tools, game consoles, and other wireless accessories are making way to our home. So the demand for better coverage of WiFi is higher than ever. The outdated routers do not have the capability to cover the whole premise and do not offer the stability to work with multiple devices at once. In such a case, replacing the old router to a modern mesh-network router is the only option which can solve the connectivity problem but it can be an expensive affair.
However, there is a new and cost-effective way through which you can expand the range of WiFi using Extenders. WiFi Extenders are a great addition to network tools which works with old systems and brings better coverage and strength to the WiFi signal. When it comes to Extenders, Netgear WiFi Extenders are an excellent choice as it provides advanced controls with a simple interface to control the network easily. So if you have bought a Netgear Extender recently, RouterGuide is going to provide some easy guides you can set up the Extender and get started with it.
How to do Netgear EX3700 WiFi Extender Setup?
Netgear WiFi Extender EX3700 is the best pick if you want to boost your WiFi signal yet keep the expenses within your budget. It’s a small extender but supports download and upload speed of up to 750Mbps.
- To start the setup process, first and foremost connect the Netgear Extender to a wall socket. Wait for a while and let the power LED to become stable. Now look for NETGEAR_EXT access point either from mobile or PC and connect to it.
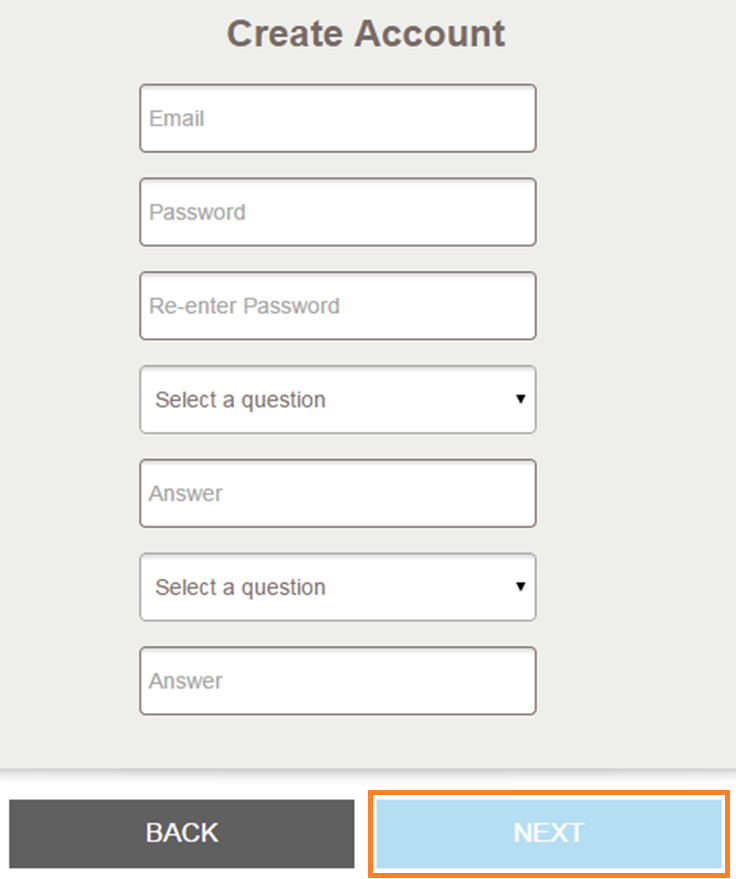
- Once you are connected, open a browser of your choice and open www.mywifiext.net. This will take you to the Setup page. Now click on New Extender Setup and provide all the details like email ID, password and security question for recovery of Netgear Range Extender in case you forget the credentials in future.
- Once you are through the details page, click on WiFi Range Extender. It will list all the routers which you want to pair up so that WiFi range can be extended. Select the router whose WiFi signal you want to extend and further provide the password of the selected router. Now, click on Next and it will start the pairing process.
- On the next page, it will ask for a preferred network configuration. Choose the settings as per your need and click on Finish. Now the Netgear Extender Setup is complete and you can enjoy high-speed internet anywhere you want.
How to do Netgear EX6200 WiFi Range Extender Setup?
Netgear EX6200 is the best range Extender for multiple routers because it has dual-band support of 5GHz and 2.4GHz network frequency. Additionally, it is a gigabit extender which means it can provide throughput of up to 1.2 Gbps. This gives you ample bandwidth for HD video streaming and multi-player gaming. So without wasting any time, let us have a look at the Netgear WiFi Extender Setup for EX6200 model.
- The EX6200 does not support WPS so we can’t set up wirelessly. Connect the Extender to a PC using an Ethernet cable. Once you are connected, open a browser either Chrome or Mozilla on your PC and type mywifiext.net. It will ask for username and password. Type admin as username and password as password and hit enter. Always, remember this is the default credential for accessing Netgear Range Extender.
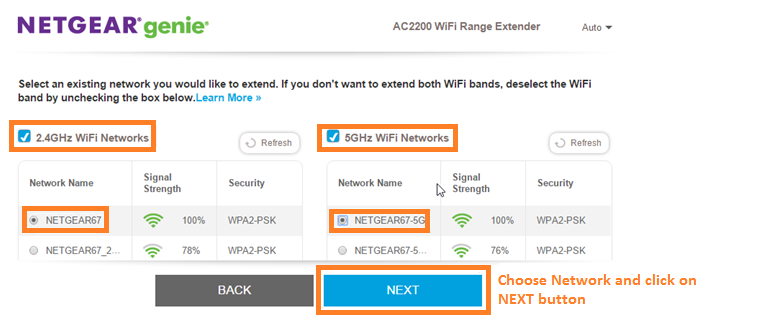
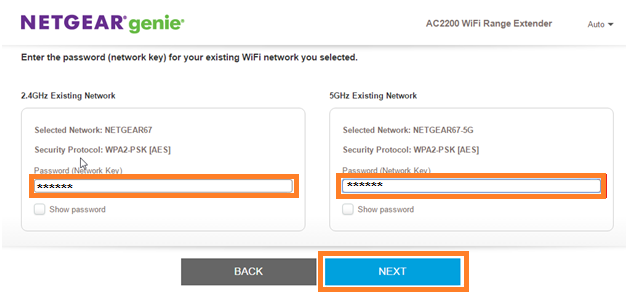
- After verification, the router will look for routers of different bands. If you have a 2.4 GHz router, then it will ask you to select the desired frequency. Select the 2.4 GHz WiFi network and click on Continue. Now provide the password of your router and again click on Continue.
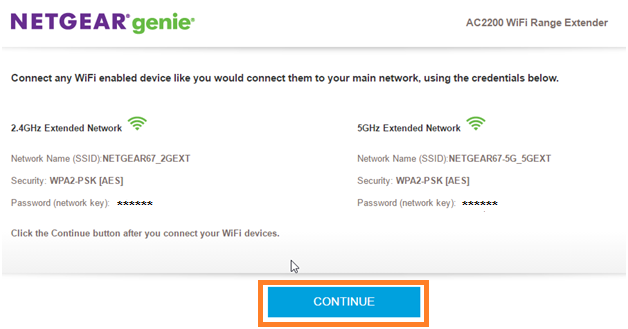
- Similarly, if it detects a 5 GHz network, then it will prompt a dialog to provide the password again. After checking the necessary points, it will offer its access point. If you want to change the name and customize it, you can do so by editing in the text box. Further, click on Continue and then it will summarize the router-extender setup. After checking the details, click on Finish and it will apply all the changes.
- Once the extender reboots, disconnect the Ethernet cable and connect it to a power socket in your preferred place. Now you can browse the internet from all dead zones where WiFi was patchy.
How to do Netgear Nighthawk X4 AC2200 Setup?
Netgear Nighthawk X4 AC2200 is a WiFi Extender which uses the latest MIMO and Mesh networking technology. MIMO stands for Multiple Input, Multiple Output and it’s best for streaming heavy content on multiple devices without network congestion. It also supports dual-band and has 1.7Gbps of throughput. So let us find out the Netgear Extender Setup for Nighthawk AC2200.
- You can setup Netgear AC2200 using the WPS feature. WPS stands for WiFi protected setup which basically means you do not have to type your password and it will automatically connect between two WPS enabled devices.
- So plug the Extender to a wall socket and press the Access Point/Extender button. Wait for a while and let the green LED stabilize. Now, press the WPS button located on the side panel of the Extender. After that, press the WPS button on the back of your router as well.
- Wait for a while as both the devices will go through an automated process and will pair up. Once the pairing is complete, both the Extender and the router will blink a solid green LED. It means both the devices have been connected and Netgear WiFi Extender Setup is complete. Now you can enjoy the Internet at any corner of your premises without any issue.
Common Problems while Netgear Wifi Extender Setup
There are certain issues which crop up while setting up Netgear WiFi Range Extender. Here, RouterGuide is going to talk about the problems and some easy fixes.
- If the Extender is not connecting to the router then put the extender near the router and try reconnecting to the network again. During initial setup, it is important that both the devices are as close as possible without facing any obstruction. After the setup, you can plug the Netgear extender anywhere you want.
- If the Netgear WiFi Range Extender is not connecting even when placed close to the router then the Extender has been connected to some other network. Try to switch off other network devices and minimize network congestion.
- For some reason, if mywifiext.net is not opening the setup page then type 192.168.0.1 manually into the address bar and hit enter. This should take you to the Setup page of Netgear Extender.
- If the Extender is not connecting through WiFi then try connecting it with a PC using Ethernet cable.
To Wrap Up
These are some handy ways for Netgear Wifi Extender Setup and expand the network coverage without costing much. If you have some other model of Netgear Router, then the setup process is almost similar. You can use this guide for those models as well without any issue. I hope through this easy RouterGuide, I could be of help to you.