Netgear AC 1000 dual-band router is an incredibly fast router and can cover your entire home network, including the dead zones. This wi-fi router provides speed up to 300+700 Mbps. Through a secure and reliable connection to the internet, you can play online games.
Also, the Netgear Ac1000 router is compatible with 802.11 a/b/g/n devices. So, if you wish to use this amazing router for your purpose, then at first you must know the Netgear AC1000 setup procedure.
Here, some of the top-notches ways are described that will assist you to configure the AC1000 router within a flicker of time.
Effective Techniques to Complete Netgear AC1000 Router Setup
Follow the given methods and resolve all your queries associated with the setup procedure of the AC1200 router.
Method 1: Manually Configure the Netgear AC1000 Router
To apply this method, ensure that you have a wi-fi-enabled device. Such as an iPad, a computer, another mobile device. Also, make sure that you have a Netgear AC1000 router. Read on to know more about this Netgear AC1000 Setup method.
Step 1
First, you need to ensure that the Netgear router is receiving power as well as the LED lights are blinking. Open the software on the wi-fi-enabled device that you wish to connect to the router.
Step 2
After that, the software will scan for the wi-fi networks. Within a few moments, you will see the available network name on the display. From there, you need to choose the network name that you wish to connect.
Note:- If you have not changed the network name during the setup procedure, then search for the default network name (SSID) and choose it.
Step 3
After entering the network name, a new page will appear on the display. Here, you should type the router’s wi-fi password. The default wi-fi password, also known as a passphrase will be labeled on the Netgear router.
Also Read: Netgear Default Username and Password
Next, tap on the Connect option. Then, your computer will be automatically connected to the wi-fi network of the router. When done, exit from the page and then reboot your computer.
Method 2: WPS Method
In order to apply the WPS method, at first, you have to ensure that all the devices support the same security settings as during the connection procedure your device will get security settings from the Netgear AC1000 router. Now, follow the directions provided below.
- In the beginning, you have to ensure that the Netgear router is turned on as well as it receives power from the power source. Then, locate the WPS button of your computer or mobile device.
- Now, press and hold down the WPS button of the router for near about 5 to 10 seconds. Release it, when the LED lights start flashing. Again wait for 2 minutes and then press the WPS button of the computer.
Then the Wi-Fi-protected setup will automatically connect your device to the router.
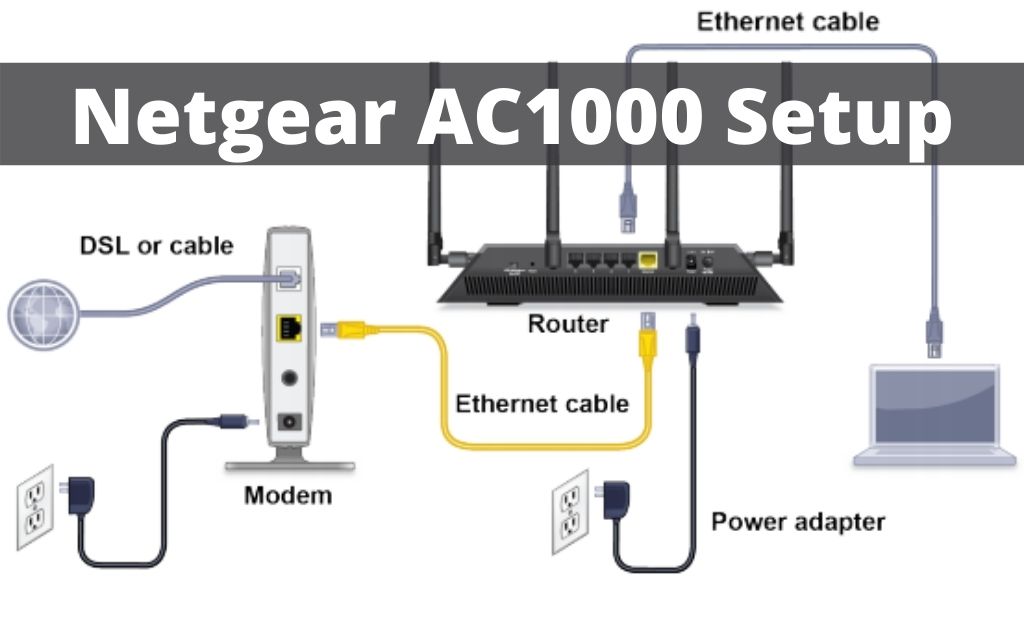
Method 3: Use a Web Browser
With the help of a web browser, you can connect the Netgear router to the computer. For more information, check out the steps explained below.
Step 1
First, ensure that the router is turned on and the LED lights are flashing. Take an Ethernet cable and connect the smaller end to the Ethernet port of the router.
You should connect the other end to the Ethernet port of the computer. If the connections have been successfully created, then a connection message will pop up on the display.
Step 2
Now, you should launch a web browser from your computer or another mobile device. Next, type ‘www.routerlogin.net’ in the address bar. After that, you will see the sign-in page on the screen.
In case, you are unable to see it, then ensure that your device is connected with any of the four Ethernet ports of the router. You should also reopen the web browser or clear the cache data.
In case, your device is set to the Static IP address, then you need to change it in order to automatically obtain the IP address from the router.
Step 3
Within the login window, you have to type the default login credentials. The default username is admin and the default password is password. After that, the Basic Home page will occur on the screen.
Here, move to the upper right corner. From the menu, choose your preferred language. In order to confirm the changes, tap on the OK button.
After that, follow the on-screen prompts and complete the setup procedure.
Frequently Asked Questions
-
How to Update the Netgear Router Firmware?
To update the firmware of the Netgear router, at first, launch a web browser from your device. Then, enter ‘ 192.168.1.1’ within the address bar. Else, you can type ‘192.168.0.1’ and then tap on the Go button.
On the next screen, you might have to enter the login credentials. Type ‘admin’ in the username field. Enter ‘password’ in the password field.
Sign in to the Netgear router and check for the available update. If an update is available, click on the Update now option. After that, the updating procedure will be started.
When finished, reboot your computer and Netgear router.
-
How to Create a Netgear Support case?
In order to create the Netgear support case, first, go to the official page of the Netgear router. Next, you must enter your email address and password associated with your MyNetgear account.
[note:- In case, you don’t have a MyNetgear account, then first, create a new account. ]
Then, tap on the sign-in option. This will open the Home Screen. Move to the left column and choose My Support from the list of options. After that, tap on the Contact Support option.
-
How to perform Hard Reset of the Netgear Router?
Locate the Reset button that might locate at the backside of the router. Use a pen and then press the Reset button for almost 20 to 30 seconds. When all the lights are blinking together, release the reset button.