Many people wanted to add a CAT6 to the wall plate but don’t know the exact way to do so. And, thus they recommend expert opinion. But, surprisingly, it is quite an easy task. If you know the right method and have the right tool, you can easily connect CAT6 to the wall plate.
First, you have to start by finding a good spot for your CAT6. It is very important to have the right location for networking hardware and the room’s layout. After that, you have to cut a hole for the wall plate. Finally, run the CAT6 between the outlet and the modem. This is just a brief idea on how to connect CAT6 to wall plate. More details are given down below.
Steps on How to Connect CAT6 to Wall Plate
In the above segment, we have given a few hints on how to connect CAT6 to wall plate. Now, we will discuss in detail the steps to do so. The steps are not as hard as you think. Just follow the instructions, and you will get your desired result:
1. Create an Outlet
Creating an outlet will help you to initiate the work. There are three steps under this to get a proper idea, and they are given accordingly.
A suitable location
The very first step is to find a suitable location for your CAT6. Search the room and locate any open spot, it will be beneficial if it is near an electrical outlet. You can use an electronic open finder to do so. This will make how to connect CAT6 to wall plate much easier.
There are certain criteria like the location must be free from surrounding obstructions and good enough space to run CAT6 cable. In many situations, it has been seen that installers recommend setting the new network at a few distances from the existing outlet. So that, it can be symmetrical and limits the unattractive wiring fixture.
Give a Proper Mark on the Chosen Location
After finding the location, to avoid any mistakes, it would be better to mark the location. You can use a pencil to do so and mark an X where the CAT6 will go. After that, you will be able to make necessary adjustments to that very location. Make sure the mark is visible enough so that you won’t go to the wrong place.
Place the Mounting Bracket
As you have marked the place now is the time to place the mounting bracket over the mark. Now, use a pencil and run the pencil along the inner edge of the wall plate mounting bracket. You will get a rough outline as a template, and you can use it to cut the hole for the wall plate. Make sure the outline is perfectly parallel with the floor.
Turn Off the Electricity
Now, you have to turn off the main circuit. This will minimise the risk of electric shock. If you plan to install the CAT6 outside your house, you might need some assistance. You might notice that the breaker panel is labelled. But, if it is not, you can take help from the electronic circuit breaker finder. And, this will help you to find the breaker to flip.
Cut the Outline
You need to make sure that the lines are neat and clean so that you won’t face any difficulties cutting the outline. Be more patient while cutting the hole. You can use a utility knife or drywall saw to do so. Make sure that the hole must not too big or even too small.
2. Run the CAT6
This also has three sub-steps that will help you with how to connect CAT6 to wall plate
Ground a Hole in the Floor or Ceiling
It completely depends on where the internet equipment is located. And, thus you will run the CAT6 either up or down. First, you have to fit a power drill and bore a hole above or below the outlet. This will help by routing the cable from the network hardware to the new CAT6. It has also been observed that the hardware setup is found in the basement or attic space beneath your house.
Run the CAT6 from Network Hardware to the Outlet
If you have to drill the floor to reach your internet equipment, you need to feed the cable through the outlet opening and then into the lower level. On the other hand, place the networking at the center and guide the cable for drilling.
Make sure you don’t run the cable too close to the electrical lines. If this is your last option to run the cable, then you are recommended to do it perpendicular to reduce electrical interference.
Secure the Mounting Bracket
Now, you have to secure the mounting bracket. You should place a rectangular plastic bracket at the front. At the top and the bottom, mould holes and direct the cables to pass through them. This will make sure that it is not overtightening. If any cables are emerging from the outlet cut the cable with the help of a proper wire cutter.
3. Wiring Ethernet Cable
Now, we come to the last step to connect CAT6 to the wall plate.
Strip the Outer Sheathing
You have to place the cable inside a wire stripper. After that, you have to squeeze the tool’s handle to clamp the jaws down around the cable. Somewhere on the package, you need to find the exact gauge of the CAT6. You can also go for slicing the cable covering if you don’t have a cable stripper.
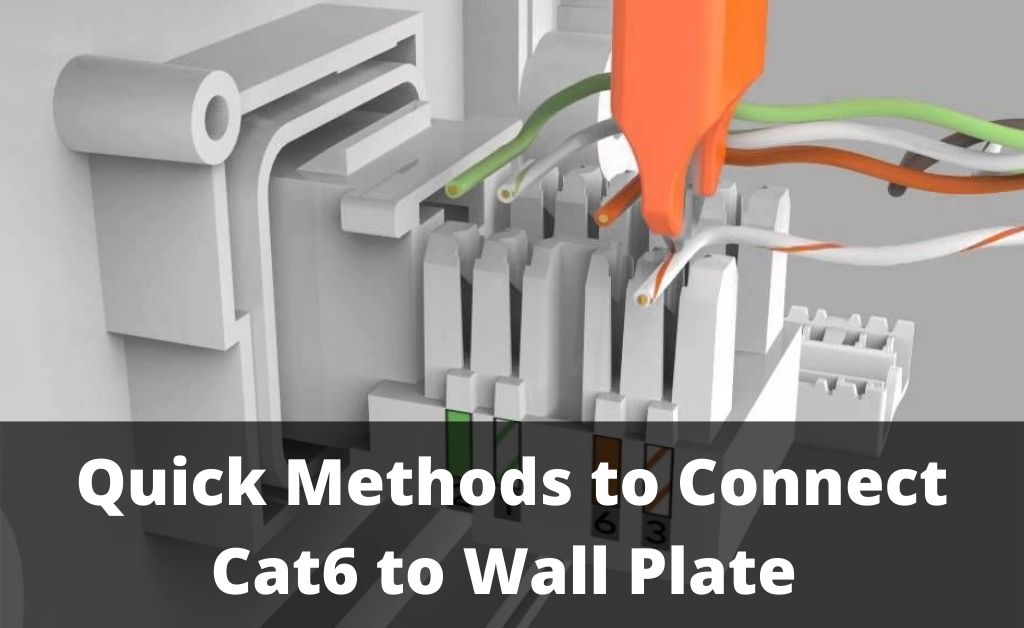
Thread the Wire Exposed into a Colour-Coded Slot
You will notice that the CAT6 contains four pairs of similar coloured wires. Now, you have to untwist each pair to separate the wires. After that, align each wire with the corresponding slot and slip it down.
Force the Wires Down to their Respective Slot
At first, you need to align the pointed end, and then push it straight down. You will observe to enable the conductivity the fork prongs will seat the wire comfortably at the bottom of the slot. You can also trim the wire to the connector.
Plug the Wired Connector
You need to cover the connector with protective cover plates and place them at the top or bottom of the connector. It’s not a huge task that you need to do; just insert the connector into the wall plate on the interior wall. You can also go for a cable tester to confirm your ethernet cable and keystone connector.
Fasten the Wall Plate over the Mounting Jack
Glide the screw into the holes at the top and bottom of the wall plate. You can use a screwdriver to tighten the corresponding holes in the bracket. Make sure to vacuum up any loose drywall or debris found on the floor in front of the outlet.
Conclusion…
So, these are all ways that you can use to connect the CAT6 to the wall plate. The steps are straightforward, you just have to follow them accordingly. Make sure you don’t make any mistakes. You need to be very patient while doing the steps. Hopfully, this will help you on how to connect CAT6 to wall plate.