The 192.168.1.5 is the default IP address of the routers and modems. With the help of this IP address, you can easily identify the network device uniquely. This IP address is specified at the backside of the router or the modem. So, that you can easily find and identify it.
The default router and modem IP address also link the Wi-Fi connection, DNS, LAN and other network settings. It also looks upon the security of the device. Further, while configuring the router or modem, the 192.168.1.5 IP address is mandatory.
The Procedures to Configure & Login
When you buy a new router or a modem, it is in its factory condition. You have to configure it to make use of the wireless network. The first basic step is to turn on your computer. After that, unwrap the device. You will get an Ethernet cable with the router or the modem, keep it aside. Now, switch on the router or the modem by plugging it into the electrical socket board.
Hopefully, you have the main Ethernet cable which is ready to connect to the router. Now, plug it in the Ethernet port. After that, you will be able to see more than one LAN port. Simply, grab the dedicated Ethernet cable that came along with the device, plug it in one of the LAN ports of the router or the modem and to the PC.
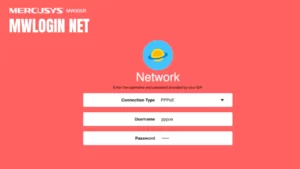
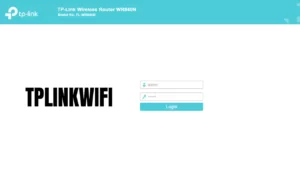
Depending on the OS you use, open the default web browser. In Windows, it’s the Internet Explorer or the Edge (The latest version). Whereas, in Macintosh, it is Safari. Type the browser in the address bar and press the Enter key, the login page will open. In most routers and modems, the default ID is “admin” and the password is set to “none”.
The main interface will open, carefully observe all the options and find out the network settings. In the network settings, there will be two options for the configuration of the IP. In this type of case, you have to know whether your internet connection is Static or Dynamic IP.
Enter the Network Credentials
If your main internet IP is dynamic, then gather all the network information like the IP address itself, DNS, subnet mask, default gateway and others. Place them in their desired place and save the details. If the Internet IP is static, then you don’t have to do anything, it will gather all the necessary network information, automatically.
Want to change the Local IP address?
If you are eager to change the network connection, then obviously you have to change the local IP address. If the other internet connection is from the same internet service provider, then only changing the IP address will do the job for you. As usual, access the network settings of the router. Now, delete the previous IP address and re-enter the new one. After that, save your changes.
Setting up the Wi-Fi Name and Password
After successfully configuring the router or the modem with the help of 192.168.1.5, you have to set the name of the device. This name will help you to identify whether the router or the modem is active or not. On the other hand, the password will protect the device from unauthorized users. Access the General Settings and you will find the option of changing the device name and setting up the password.
How can you find the Network IP Address?
As the router or the modem’s default IP address, 192.168.1.5 is known to you, it’s important to know the network IP address, too. There are two ways – One is asking the Internet Service Provider, and the other is getting it from your computer itself. Access the Control Panel or the Settings to get access to the Network section.
Now, select the Wi-Fi network and you will find the list of protocols. The IPv4 is responsible for creating a network connection and surfing the internet. Now, select the IPv4 and open the Properties. Further, you will be able to see the IP address. It’s better to write it down somewhere and keep it safe. Taking a screenshot of the IP entire Properties box will also do the job.
In the case of Macintosh computers, the Apple menu will help you to locate the network IP address. Get access to the System Preferences and click on the name of the network that you use. Finally, double-click on the network and you will eventually see the IP address.
Summing Up…
To secure your Wi-Fi network, setting a proper password is highly essential. While setting up the password you need to know what type of password can give you the ultimate security. Set a password that has 16 characters. Then, try to use a VPN while surfing the internet. This will protect your network from unauthorized access. Further, a security application will protect your system as well as the router. It will also protect the 192.168.1.5 IP address, as well as the router or the modem’s firmware.