Login to the web interface of the TP-Link Extender is necessary for keeping track of your TP Wi-Fi Extender account. If you have a TP-Link account, you will be able to access the information as well as make the necessary changes whenever you required to do so.
However, if you are unaware of how to perform TP-Link Extender setup, then you can have a look at the section hereunder. Here we are about to discuss some easy steps that can help you to log into the TP-Link Extender on your own.
How to Perform TP-Link Extender Setup?
It is quite simple and easy to setup the TP-Link Extender. Below are the instructions you can perform to setup the TP-Link Wi-Fi Extender:
Step 1:
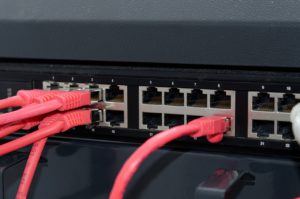
In the beginning, connect the TP-Link Extender to the power supply to turn the device ON. Then, take an Ethernet cable and connect the device with your computer.
Step 2:
Open your favored web browser on your computer. Then, visit the official website of TP-Link. Click on the ‘Quick Setup’ button and then tap on the Next button.
Step 3:
Next, the device will start to search for the available broadcast network. Select the broadcast network from the list of wireless networks. Then, tap on the Next button.
Step 4:
Now, you will be asked to enter the password of your wireless network. So, enter the password in the respective field.
If you want a single large broadcast network, or if you want to create a different network, then tap on the Copy button.
Step 5:
After that, click on the Next button and then review the network settings from the final window. If you see all the settings are correct, tap on the Finish button to complete the process.
Now, you have completed the TP-Link Extender setup successfully.
How to Perform TP-Link Wi-Fi Extender Setup?
To perform the TP-Link Wi-Fi Extender setup, you can have a look at the steps mentioned below:
Step 1:
First of all, place the device near to the access point or router. Afterward, wait for a few seconds until the wireless LED indicator starts blinking.
Step 2:
Now, press the Reset or WPS button of your router. Then, press the Power button of the TP-Link Extender. Connect the device to your computer by using an Ethernet cable.
Step 3:
Next, disconnect the system from all the broadcast networks while performing the setup process. After that, tap on the ‘Wi-Fi’ network icon by going to the left pane of the taskbar. Choose the TP-Link network name from the list of available networks.
Step 4:
Now, open a web browser on the system and open the official website of TP-Link. Once it redirects you to the ‘Windows Security’ page, you will be asked to enter the login credentials.
Enter the username and password of the TP-Link Extender in the respective field. You will get the login credentials on the documents that come with the device. Tap on the OK button to proceed.
Step 5:
It will navigate youtube the TP-Link page. Select the operation mode and region. After that, tap on the Next button.
Next, enter the password in the respective field. Then, click on the Next and then the Finish button. Wait for a few minutes until the wireless network will connect.
Now, you have completed the TP-Link Wi-Fi Extender setup successfully. So, you can check the speed of the network.
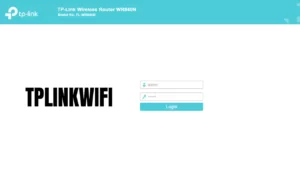
How to Login to the TP-Link Wi-Fi Extender?
To log into the TP-Link WI-Fi Extender, you can perform the following steps in their respective order:
Step 1:
First and foremost, connect the system to the LAN port of the TP-Link Extender by using an Ethernet cable. After that, assign a static IP address on the system manually.
Step 2:
Open the Start menu by going to the Start menu. Then, navigate to the ‘Network and Internet’ category. Click on the ‘Network and Sharing Center’ option. Afterward, tap on the ‘Change Adapter Settings’ option.
Step 3:
Next, tap on the ‘Local Ares Connection’ option and then choose the Properties option. Click twice on the ‘Internet Protocol Version 4(TCP/IPv5)’ option from the next page.
Step 4:
Now, you will see the static IP address. If you see that the IP address is ‘192.168.0.254’, then change it to ‘192.168.1x.’
Open a web browser on your computer and then enter the IP address in the address bar. Hit the Enter key from the keyboard to continue.
Step 5:
It will ask you to enter the login credentials. Type the credentials in the ‘Username’ and ‘Password’ field. Make sure that you have entered the correct credentials.
Note: By default, the login credentials are:
Username: admin
Password: admin
After entering the credentials, tap on the OK button to log into the TP-Link Wi-Fi Extender.
How to Configure TP-Link Extender with WPS Button?
To configure the TP-Link Extender by using the WPS button, first, connect the device to a power supply near to the main router. After that, press the WPS button of the router and then press the WPS button of the TP-Link Extender.
Wait for a few seconds until the WPS LED indicator starts blinking on both the Range Extender and router.
Note: After a few minutes, the broadcast signal LED of the TP-Link Extender will off. It indicates that the WPS process failed. In that case, you will have to press the WPS button once again.
Repeat the same process until you become successful. Make sure that you keep the TP-Link Extender on a suitable place where you wish to extend the broadcast network coverage. Now, you will be able to enjoy the broadcast network connection.
These are the steps to perform TP-Link Extender setup. We hope, the above steps will definitely help you to setup the TP-Link Extender. If you want to read more setup guides on a similar Extender model, you can follow our website regularly.