Netgear produces some of the best routers in the market. They have top of the line products and Netgear Nighthawk is one of them. Nighthawk single-handedly brought limelight to Netgear because of absolute great performance. If you recently bought Netgear Nighthawk router and looking to set up the router, you would want to read the login instructions. Worry not, RouterGuide is here to help you with Netgear Nighthawk login process in simple and plain terms. So without wasting any moment, let us go through the steps.
How to get started with Netgear Nighthawk Login Process?
Nighthawk is Netgear’s best product so the login process is a bit different from other models. Here you will learn about the steps as well as the intricacies of a router network. Before you proceed, let’s brush up with the basics of router and networking in general.
Nighthawk is a highly advanced router with its Operating System installed on its main board. It may come as a surprise, but today high-end routers come with an OS pre-installed because the data transmission is handled with lots of optimization. When you are trying to log in to the router using Netgear default password, it means you are trying to access the Operating System which is also called the firmware. So you need to be careful while accessing the login page and operations thereafter.
Having been through the basics, let us now jump to the instructions. For your information, the steps are written in a non-technical language so that you can easily navigate to the login page.
Steps For Nighthawk Router Login:
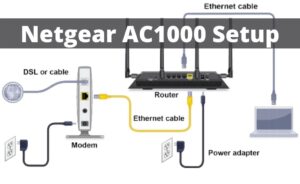
- First and foremost, turn on the router and plug it into a power socket. Next, connect the router to your PC using an Ethernet cable. A solid LED will blink at both the ends, router as well as the PC. After that, move to the PC.
- Now open a web browser on your PC which supports localhost operations. It is recommended to use Google Chrome, Internet Explorer or Mozilla Firefox for better compatibility. If your computer does not have Internet Explorer, then open Microsoft Edge which is the latest browser from Microsoft and it works well.
- After that, type routerlogin.com into the URL bar and hit enter. If this address is not working then type routerlogin.net. Both of these addresses are assigned to Netgear Nighthawk routers. So either of one should definitely work. For your information, this is the default IP address for Nighthawk routers and it is written in a DNS naming convention.
- Once the login page appears, it will ask for username and Netgear router password. Type admin in the username field and password in the password field. Keep in mind, both username and password are cases sensitive so type in lower case only. Make a note, this is the Netgear default password.
- Once you have entered the credentials, click on the Login button. It will then verify the username and password and will let you in. This way you can access the login page and proceed further with the default username and password.
Common Issues & Solutions while accessing Netgear Nighthawk Login
- Generally, you should not face any problems during Nighthawk router login, but in case you run into some trouble then follow these instructions. If the login page is not opening then, make sure there is a proper connection between the router and the PC. Check if the LED is blinking on both sides.
- After that, make sure you have connected the router using an Ethernet cable and not wirelessly through WiFi. The firmware is a sensitive system so one should establish a successful connection through a physical wire for flawless communication.
- Next, open Control Panel and head over to Network and Sharing Center. There, click on Change Adapter Settings on the left panel. It will open a new window. There, right click on Ethernet adapter and select Enable. This way the adapter will be activated and the OS can detect the router.
- After applying all the above solutions, if the problem still persists then use a DNS free address. Type 192.168.0.1 or 192.168.1.1 in the URL bar and hit enter. These addresses are without DNS naming scheme so the browser can easily detect the router through the localhost.
- In case, the router is throwing the wrong password error after entering Netgear default password then someone must have changed the router’s password. To regain control of the router, you will have to reset it. Press and hold the reset button on the back of the router for a while and release it once all the LED blinks. The router will restart and then you can enter the default username and password and it will let you in without any error. Do keep in mind, this process will erase all your network configuration and you will have to configure your router again. So keep a network backup handy.
Conclusion
This is how you can log in and manage Netgear Nighthawk router in simple ways. However, if you face any issue, try to apply the fixes given above. RouterGuide has tried to make Netgear Nighthawk login process as simple as possible and hopes it was a helpful guide. The Netgear Nighthawk is an excellent router and customizing it would make your experience even better.